How to Use Secret Codes on The Samsung Galaxy Phone

Samsung is the largest company on the world for make the new latest devices. Here is one Device Samsung Galaxy Smartphone and I am share with you some Secret about Samsung Galaxy that How to Use Secret Codes on The Samsung Galaxy Phone.

How to Use Secret Codes on The Samsung Galaxy Phone


Samsung Galaxy S4 Smartphone  Secret Codes , Samsung Galaxy S4 mini Smartphone  Secret Codes, Samsung Galaxy S4 Smartphone Zoom  Secret Codes, Samsung Galaxy S4 Smartphone Active  Secret Codes,  Samsung Galaxy S4 Smartphone Series  Secret Codes , Samsung Galaxy Smartphone Series Secret Codes, Samsung Galaxy S4 Smartphone Format  Secret Codes, Samsung Galaxy S4 Smartphone Reset Secret Codes, Samsung Smartphone  Secret Codes

How to Use Samsung Galaxy S4 Smartphone Secret Codes
 1- *#0*#  - Testing mode Secret Code
2- *#06#  - Show the IMEI number of your phone Secret Code
3- *2767*4387264636#  - show the product code
4- *#32489#  - Service mode secret code
5- *#0011#  - Service Menu  secret code
6- *#0228#  - Battery status (ADC, RSSI reading) secret code
7- # 7353 #  - Quick test menu) secret code

How to Use  Samsung Galaxy Software, Hardware and Network Secret Codes

 1- *#*#3264#*#*  - Show RAM version Use Secret Code.
2- * #1234#  - Check software version of phone Secret Code.
3- *#12580*369#  - Check the software and hardware information Secret Code.
4- *#*#273283*255*663282*#*#*  - Opens a file twice network Secret Code
5- *#0011#  - Service mode: signal status Secret Code
6- *#*#1575#*#*  - Service mode: GPS test Secret Code
7- *#*#232338#*#*  - Show MAC address of WiFi Secret Code
8- *#*#232331#*#*  - Bluetooth test
9- *#*#232337#*#  - Show Bluetooth device address
10- *#3214789650#   - Enter AngryGPS configuration
11- *#*#8255#*#*  - Gtalk service monitor galaxy s
12-  *#*#1472365#*#*  - GPS test plus


How to Use Camera, Touch and Disply Secret Codes

1- *#*#34971539#*#*  - Camera firmware info and update Use this secret code.
2- # 34971539 #  - Camera Firmware Standard Use this secret code
3- # 7412365 #  - Camera Firmware Standard, phone / CAM FW Ver Check Use this secret code
4- # 2663 #  - TSP / Touch key / SensorHub Firmware version Use this secret code
5- *#*#2663#*#*  - Touch screen firmware version and update Use this secret code


How to use Samsung Galaxy S4 Reset Codes 

1- *#7780#   - use this code for Factory Data Reset
2- *2767*3855#  - use this code for Factory Format WARNING! IT WILL REMOVE ALL OF YOUR DATA  WITHOUT ANY CONFIRMATION, SO BE CAREFUL WITH THIS CODE!
3- *#*#7780#*#*  - use this code for Factory data soft master Reset
4-  *2767*2878# - use this code for Current firmware with factory default settings

How to Disable The New iPhone Auto Brightness Function

In this Article we will discus that How to Disable The New iPhone Auto Brightness Function. When you buy a new iPhone that you 1st set the display options. The new Version iOS is auto adjust the iPhone display. if you want use the manually of the iPhone display function. then follow me on the below tips.

New iPhone Auto Brightness Function


Here is How to Disable iPhone Auto Brightness.
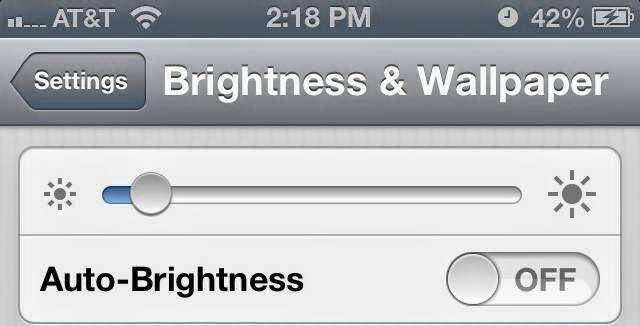
  • Tap on Settings > Wallpapers & Brightness.
  • Turn off Auto-Brightness
1. Tap on Settings.

2.You can Find here the Turn off icon on the Brightness & Wallpapers and click on them auto-brightness setting will be automatically Off.


3. Now you adjust your iPhone Brightness function. go on the dark place and adjust your iPhone Brightness.
4. Now go to the setting again and Turn On the auto-brightness setting.

5. This is the full options about iPhone Display Setting. Now enjoy your iPhone display and watch movies wallpapers and games.

How to Create Facebook Account ID and Complete Profile

Today I am sharing with you that how to create a Facebook Account ID and how to create a Facebook Complete Profile with all options. Follow me on the below tips and easily create Facebook Account.


What is a Facebook?

 In the first step you know that what is a Facebook.

Facebook is the world largest online social networking website. Which was creating some American student in Harvard University in the year of February 2004. The Facebook owner has created for limited membership to Harvard students, but after some time expanded it to colleges in the Boston area, and other universities. and now in these day’s every one registered and create account on Facebook to be at least 13 years old to become a registered user of the website.

Facebook users must register before using the site, after that the users has create a personal Facebook profile, and add to friends family and other users as friends,


How To Create Facebook Email and Registration:

In this article we will disused the Facebook all registration method step by step. Here is how to create a new Facebook ID and Profile.

In the first step Facebook want to the primary email ID like Gmail, Yahoo or Hotmail etc.. the primary email ID must for Facebook because it helps to you for recovering your password in case you forgot your Facebook password.

 After that open the Facebook Social Networking website. www.Facebook.com. when they open you can find all options on the main page see on the below image.


On the the Facebook main page you will find Sign Up Option here. Enter your first name on 1st box and enter the last name on the 2nd box. and the below box enter the primary email id like yahoo. Hotmail. gmail etc.. and aging the next box also enter the primary email id. and the below box enter the strong password. select date of birth and gender after that click on Sign up Button.

And the next step complete the all required. Enter education data. City , mobile number and map.

In the last step if your id complete then confirm it form primary email id. U have got a message from your primary email. Open your primary email id. And click on the inbox and Facebook message and confirm link. And now your id will confirm.

Enjoy this your Facebook id and make a lot friends and share your pictures and videos on them.


How to Format Write Protected USB Flash Drive

Today i am sharing with you that how to format write protected USB drive and memory card. Some USB flash drive and memory cards auto write protection switches, when you delete file or format them. It’s give a error that usb drive was write protected. Here are many steps that you can try to format your USB Flash Drive and remove the write protection error. But  no guarantee for you If your USB drive or memory card will be corrupted or broken. Follow me on the  below steps and easy format  write protected usb drive and memory card.


What is Write- Protection?
Write- Protection: Write protection error to mark all data that cannot delete and modified. You can only view and read Write-protected files and media. And cannot any correction and editing on them, and cannot delete and format write protected data from usb flash drive, hard drive and memory card.

 How to Remove write protection using Regedit.exe You can find the regedit.exe file on the any version of windows xp. Click on the start button and click on the run and write regedit.exe and enter. The new window will be popup. Navigate to the following key: Computer\HKEY_LOCAL_MACHINE\SYSTEM\ CurrentControlSet\Control\StorageDevicePolicies


Now you can double-click on the Write Protect value in the right-hand pane of Regedit.exe. Change the Value data from 1 to 0 and click OK to save the change. Close the all program and restart PC. And connect the USB flash drive again, you should find it is no longer writing protected. After that you can easily format your usb flash drive. If you can not find StorageDevicePolicies, then you can create a new key in the Control folder and choosing New ->  key.

After that double-click on the new key folder and right-click once again and choose New -> DWORD. Give name in this WriteProtect and set its value to 0. Click OK, exit Regedit and restart your PC. If this Method not working on your PC  then follow me on the below steps.

Write-protection Solution with using Diskpart

What is Diskpart? In computing, diskpart is a command-line hard disk partitioning utility included in versions of the Windows NT operating system line from Windows 2000 onwards, replacing f disk which was used in MS-DOS based operating systems. This utility prevents creating multipartition layout for removable media such as flash drives. It is also used for partitioning internal hard drives.

How to Format Write Protected USB drive using Diskpart

Connect your USB Flash drive and click on start menu  select run and write cmd.exe on them (or Start screen in Windows 8). For Windows XP users, click Start and selct Run, and type cmd.exe in the box. NOTE: you may need to run Cmd.exe with administrator privileges if you see an “access is denied” message. To do that, right-click on the shortcut and choose Run as administrator. In Windows 8, simply choose Command prompt (admin). Now, type the following, pressing Enter after each command: diskpart list disk select disk x (where x is the number of your USB flash drive – use the capacity to work out which one it is) attributes disk clear readonly clean create partition primary format fs=fat32 (you can swap fat32 for ntfs if you only need to use the drive with Windows computers) exit


You will done the method of Format Write Protected USB drive and Memory Card.